Here is a recent creation on behalf of a family member, who asked if I could make a little something for a special friend of theirs. It had to be "very pink and lacey"… and oh what fun I had with it, as it was a million miles away from my norm (and my comfort zone)! It was to be a 1/12th scale
sitting room with specific items based on the recipient’s own special possessions and
likes, including her love of reading so a bookcase (she is a big Jane Austen
fan), a “pink cuddle armchair”, mirror, Ginny (her Cavalier King Charles spaniel)
, her favourite plant (aglaonema), a Nursing Times (she is a nurse), a teapot & mug (as she
is a big tea drinker), plus replicas of
two of her precious family pictures. So here it is and this is how I made it...

After some pondering and discussion, it was decided to use a vintage clock
that I had tucked away in my old workroom, it was left over from a past project. Old clocks are ideal if one is looking for something small and
unobtrusive to make a simple room scene in. The glass clock face had not been in great condition and was long gone, but the
back of the clock had the most wonderful miniature door, as is often the case.
Hence the original back of the clock was now the front! The downside was that the exterior was quite marked, but I was confident I could restore it up to a point.
The glass had already been removed and the back reinforced with thick cardboard, covered in felt and edged with cord - a technique I have used umpteen times before.
The hole inside was filled with a round piece of thick cardboard, and interior ceiling/walls painted a flesh shade of pink.
I spotted some lovely funky pinkish craft paper in an art shop which was perfect. It was cut to shape and fixed to the back wall. As a focal point, I decided to insert a simple vintage fireplace that had seen better days and a pre-loved mirror, very similar to the recipients own lounge mirror.
Once the craft paper was in place, pink felt was fixed down to represent carpet. The fireplace and a strip of wood offcut to be used for a hearth, was painted bright pink, then fixed centrally in place. The mirror was glued above the fireplace...this was now beginning to take shape.
A family picture and photo document which had a special resonance to the recipient, were created and relevant frames made from strip wood, and glazed with acetate. They were fixed to each side of the mirror. So too some antique lace fixed around the doorway, just to give it a bit of frilliness :)
And now for the other accessories...
The big "cuddle chair" was literally a spare vintage one that I had tucked away for a rainy day, as a back foot was cracked plus the fabric was not a particularly attractive floral pattern.
However, I decided that the back foot would be unseen, and the floral fabric could be disguised by hiding under several layers of pink acrylic paint - sneaky trick I discovered many years ago and quite effective!
A vintage cushion that I had tucked away, finished off the chair perfectly.
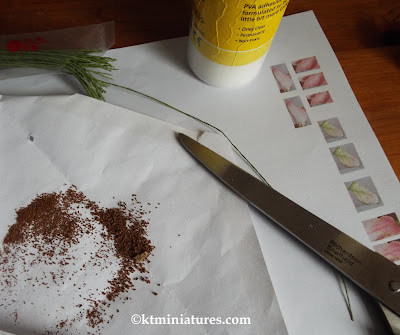
The "aglaonema" plant was created from using the leaves from this photo supplied of the actual plant, which were then printed on thin paper and cut out.
Using Tacky Glue, they were then fixed to green florist wire, which was then set into a mixture of glue and dried tea leaves inside an old wooden pot, painted pink of course. :)
It kind of worked and I was quite pleased with the result.
Ginny the dog was represented by using a scaled down photo of her, which was then stuck to cardboard, glazed with acetate, framed with wood strip and given wooden feet. Finally it was topped with a tiny brass handle I had in my "spares box".
The bookcase was made from wood strip painted in burnt umber acrylic, and filled with almost 50 of my handmade books.
Yes, they took absolutely ages to make - although many of the covers were tucked away in a file which I had already created and pre-printed onto matt card a long time ago (left over from the days when I used to make and sell miniature books). Although, whilst creating some Jane Austen books from images found on the internet, to my dismay I discovered my hastily bought cheap printer (after my other one suddenly broke) would not print on card! So I had to resort to a Plan B...and print the miniaturised scanned covers onto paper, then stick them onto card, and then create cardboard inserts...but it worked ok!
All the printed covers I edged in gold gel pen, and some had miniaturised paper dust covers which were glued over coloured card. For most of the books, I inserted tiny wooden inserts, all cut to fit from old strip wood. For the smaller and thinner books I created cardboard inserts. It is ages since I made tiny books but I really enjoyed the creativity of it all :)
I have left them all loose so that the recipient can arrange them as she wishes.
I added a tiny vintage occasional table, tiny mug and teapot with decorative tea cosy - all of which I have had sitting in a box for ages but which suited this project beautifully. Plus I created a mocked up Nursing Times and a tiny Pride & Prejudice book - as these also have specific resonance to the recipient. The plant was placed on the mantelpiece, along with two British artisan made purple glass candlesticks with mock candles (I have had several of these for many years sitting unused in a box and shamefully I cannot remember the maker's name - all I can remember is that he lived on the south coast).
Finally, the exterior was tidied up using a combination of burnt umber and raw umber acrylic paint applied with a fine paint brush to disguise the ugly marks to the damaged exterior. Then my last task was to buff the exterior extensively with wax polish and a soft cloth. It came up a treat!
Thanks for taking a peek.
Celia